Saturday, 14 March 2015

DIY! BB Cream!!! I'm in love!!๐Ÿ˜

Hey pretty ladies! I'm back with another DIY!! Now I know I haven't been updating my blog and I'm sorry for that! I've been very busy so I haven't gotten around it!:-( BECAUSE!!!! well you pretty ladies will find out soon enough! ;-) shh! Its a surprise! 

So anyways ever since the word BB Cream has entered the beauty world! I've been very excited for it! But I haven't gotten any BB Creams of store bought, I wanted to try it but I never got a chance to buy any! So I thought why not just make one!  
 And Oh yes! this stuff is sooo good! You guys have to give it a try!
I love wearing foundation just to get the job done. but i want sheer for an everyday use and to be honest! Im not very fond of going through the primer and sun screen and moisturizing steps all through every day! So this stuff gets the job done quick! and it gives me exactly what I want!
This is love at first sight for me!!:-P and today when I was running late and I had exactly 5 minutes to run to a baby shower. I just applied this and ran out! It hasn't moved since 1 o'clock and its about 10 p.m. at the moment. 

SO! Lets get to it!!!:)

This is the finished product.


Things you'll need!
1: Any face moisturizer. I've been wanting to try simple beauty but I cant get it here in Pakistan. So I
do with baby lotion. Nothing else suits! :( anyways this one has aloe and Vitamin E.
2: Sun Screen! I have the Neutrogena Ultra Sheer! mine is SPF 70, my dermatologist recommended it so use whatever you use!
 You know Bobbi Brown swears by this. does that lady look anywhere near 50!! No! but she is, So use use use!  She says " Its never too late to start using it!"
3: Face primer. I have Rimmel fix and perfect. its tinted. you don't need to use tinted but thats what I have.
4: Foundation! Now you can see I have two here. You dont need that many. But my foundation is Neutrogena skin clearing foundation. I Love this stuff! its absolute perfect for me. But yes its full coverage so I use very less. But I use this because well its Blemish Balm so if u have any blemish clearing cream you can use that. You dont need this specific foundation.

My other foundation is my sisters Mac Match Master I think.  Its 2 shades darker then mine, I added this because when you mix your regular foundation with the white products it lightens it more so this is for adjusting the shade.

5: Any container. I used my bath and body works hand sanitizer one. I can just throw it in my bag so thats why.
6: any stick or spoon to mix.
7: Bowl to mix.


First add your moisturizer. I just eyeball it. a big glob of it,

Second add the sun screen, I used this less since the mac foundation had SPF 15 in it too but that's not enough coverage.

NOW THIS STEP IS OPTIONAL!. I added a bit of my Garnier Skin Natural lighting cream, just a tiny bit because I have very fair skin but horrible pigmentation. You dont need to do this though. its optional.

Here's just a tiny glob on top as you can see. I didn't use much.

I then added my primer as you can see its tinted.


Now mix and see how light it got. Mix so you can adjust the amount of foundation you need to add,.

Now I added my Neutrogena foundation and mixed it. 
So I can adjust how dark I need it more.

I just added like 2 pumps of the Mac match master. That was enough for me.
Now if you want more coverage you can adjust the amount of foundation you add. you can 50% foundation and 50% rest of the stuff but my primer was tinted too so I didn't need to do that and plus like I said before, I dont want too much coverage.


Now Mix all together well and your done!!!. Please give this a try and tell me how you like. I would love to hear from you lovely readers! Bye ladies:)



Wednesday, 25 February 2015

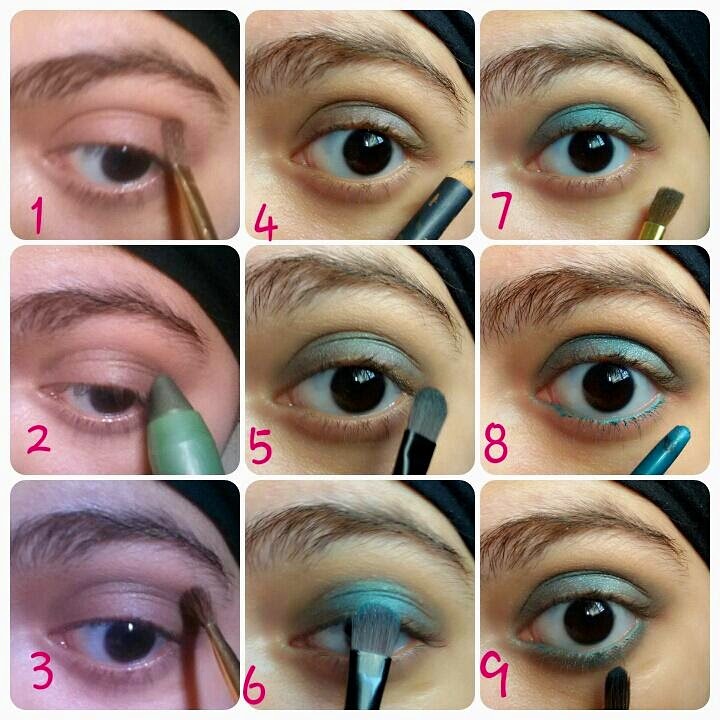
mezmering Mermaid ☺! !! Makeup Tutorial


                 Hey pretty ladies!! I'm back with another tutorial!! So lately I've been running around for my classes again. its different this time!! Can't wait!! Anyways I was going through some inspirations and i found some colors for decorating:-P You guys are probably confused at the moment, anyways I was looking for color inspirations so I was looking at some colors and saw this beautiful bathroom designs with ocean toned flooring designs . So it clicked in my mind! Why not a mermaidy tutorial. Yes I know Mermaidy is not a word but I like it and its my blog so I will make up random words. :-D
Because The Dictionary In My Mind Is So Awesome:'D

Any ways here's the look guys!!! Hope you guys like it, I'm sorry I'm trying to get better lighting because the weather really hates me:(


Here's the look ladies. :) prime your lid
1. Take a peachy matte shade and apply it in the crease as transition shade.
2. Take a olivey green shade and apply it  in the crease.
3.Blend it out.
4. Take a greyish eye pencil and apply it all over the lid.
5. Take a dark green shade apply it all over the grey shade.
6. Take a metallic sea foam green shade and apply it just in the middle of the lid.
7. Take the dark green again and blend it to the outer corner of the lid and the inner 1/3. So both sides of the lid are dark. But the middle is a beautiful  metallic shade.
8. Take a peacock green eyeliner and apply it in the inner corner.
9. Take the dark green shade and apply it all over your lower lashline. Blend with the same peachy shade and dab the metallic shade in the middle. Same process as the top.
Apply mascara and your done!!!

The stormy eyeliner is from Revlon. I used this as the base. Its the wet and dry eyeliner. I think its discontinued so any dark grey shade will work. 
The eyeliner in the water line is  "emerald sparkle" by Rimmel Exaggerated eyeliner. I think tha'ts what its called:)
The eyeshades are from my Victorias Secrets makeup kit and 
the middle of the crease shade is from an Ulta palette. guys these specific shades are not necessary to use. any similar shade you have will work. improvise!
The jumbo crayon is from Flower cosmetics in "olive my love"
Lip combo is from the same VS Kit.


 WEIRD! :D anyways add a nude lip and one shade darker blush then lips and thats it!! all done!!
Give it a try and tell me how you like it!!


Tuesday, 3 February 2015

GLITTERING AMETHYST! Makeup tutorial!!!

Hey pretty ladies, whats up!?  So day before yesterday was my cousin's wedding and I did this makeup look I came across the internet of Amanda Seyfried picture. It was an old picture and sadly I cant find it right now. :( boo. 
Anyways it was plum and sparkly with glitter and just breathtaking! I fell in love with this look.
But sadly my camera and cloudy weather didn't do justice to the colors so I apologize for that. im trying my best guys. 
 Soooo! Lets start!


Apply your primer first on your eyelid,
1: Take a shade darker then your skin tone and apply it to the crease.
2: Take a amethyst shade (purplish), mine had glitter already in it and apply it to the lid.
3: Take a pencil brush or any you like, and apply a dark plum eye shade to the outer of your eyelid.
4: Also take the shade downwards to the lower lash line so you have a halo of plum around your eyes.and also 3\4 from inner side do the same with the amethyst shade.
5: Take a light pinkish white highlight shade and highlight the brow bone.
6: Take a rose gold shimmery shade and apply it to the inner corner of your eye.
7:Apply black liner on the top lash line and purple eyeliner to the lower lash line.
8: Apply mascara and your done!! 


My eye shadows were from Ulta beauty makeup kit. 
my eyes shade for inner corner is Amber Rush from Loreal infallible eye shadow.
For crease: I applied a warm matte brown from my Avon palette.
For lips: I applied a combo of Rimmel London Kate Moss collection in no. "105" & Bare minerals buxom lip gloss in "Leslie". I love this shade.
And for Blush: I applied the lipstick and blend it out for a natural look. It really is a beautiful shade. my new favorite!!
For eyeliner: I used professional glam eyes liquid liner from Rimmel London and for the purple eye liner I used NYX Cosmetics 'slide on' eye pencil in "Pretty Violet".

Here is the look at night. My camera for some reason is not picking up the glitter very well:(  and guys apply glitter separately if you don't have a glittery eyeshadow.

and that's it guys!!! its a soft sparkly smokey eye and its so quick, that even i was shocked!!!:) 
hope you guys like it and please do give me your response, I would love to hear from you guys!!

Sunday, 25 January 2015

DIY Hydrating Moisturise! !!! beat the winter skin

Hey ladies, I love the winter season, there's just something about curling up with a good book and a hot drink in the cold nights. I find it peaceful and quiet, and of course the snow!! oh my! how could you not love the snow? As you can tell I find snow very exciting:-D But sadly In Karachi, there is no snow:-( but that's okay!!!! We're having very weird weather here. Its getting colder now in January and perks of living on the 6th floor of a building. Its FREEZING! But that's okay!!!:-P

 Anyways getting back to the topic!!! When winter comes, Dry and ashy skin is included in the package! and that just ruins our beautiful glowing skin.
So we need a little pick me up! We need to hydrate our skin. and we need good quality moisturizer. But I find my store bought moisturizers don't get the job done, Specially for my mom's skin. My mom has a very sensitive skin and winter does damage to it, my mom's face get dry, rough and just rashes all over! So I decided we need to get to the bottom of this!!

Lets start!!!
Ingredients:
1. Glycerin
2.Extra Virgin Olive Oil
3.Coconut Oil
4. Rose Hip or Jojoba Oil (Optional)
and that's it!!!


Glycerin:
Glycerin has hydrating properties. 
As we age, the skin looses moisture so regular use of this
 will help restore the moisture.

For this we will use 1 tbsp of glycerin.


Extra Virgin Olive Oil:
Now everyone knows Olive Oil has numerous benefits! Its THE beauty essential! 
Olive oil has anti-oxidants, Vitamin A and E. Not only that but Olive Oil helps restore elasticity in the skin too!!  Now extra virgin olive oil is just the lighter version,

For this we will use 2 tbsp of Extra virgin Olive Oil.


Coconut Oil:
Coconut oil is my absolute favorite. Its my favorite beauty and hair essential.
Coconut oil has saturated fats which make the skin smooth.
Coconut Oil also is great and famous for its anti-aging properties and it has loads of vitamin E
and it also has lots of protein.

Now coconut oil is the star of this moisturizer.
This bottle is the 120 ml. I used half of this, so 60 ml.


Now This part I forgot to take a picture of, So I'm very sorry for that.
Now mix all these ingredients together in a bowl and put it in the fridge for about 30 minutes, or just until its hard enough that you can put your finger in and leave an impression in it .

Now beat the mixture with a beater, just until its light and fluffy, like whipped cream. But don't beat it for too long or it'll end up melting. I just using a Steel Bowl, it stays cooler longer.

Now put it in a clean container and leave it in the fridge for 5 more minutes. 
And this is the result!!!

Don't worry if it hardens into Balm like consistency, just leave it out and it'll soften up,
like this! It will start melting in your hand so use it quick!!. I love using this everyday specially at night because our skin will absorb it quickly at night. And soften it.

 Put it in a cute container:) and your done!! 
You can use this all over your body and face. You can also use this for removing makeup! It removes my makeup so quickly and wipes every trace of it. Its also great eye makeup remover. its just wow!!! Just be careful, if u get it in your eyes it will slightly burn. but you can just wash it out and don't worry about the glycerin, its water soluble,

Not Only this but its also great for split ends too! 

Guys since I've been using this. my skin is not drying out. My mom's skin is back to normal. My sister took my jar. My neighbor asked me to make it for her too!! SO YAY!!! Mission Accomplished!!!
So do give this a try! and Do tell me how you like it :)


Sunday, 18 January 2015

HAUL!!!!!! :-D


 HEY PRETTY LADIES!! WHATS UP!!!:-P Hey guys I apologize for totally being out of the scene. But my exams were going and everything just got hectic in the last 4 months. I didnt even know when new years came along. :-/ yup thats how it went. Sooo any ways I have a haul today for you guys. it has been on hold for a few months now.

     Now my older sister lives in England and Shes in love with makeup just as much as I am. She kinda spoils me alot;-P Thanks Big Sis!!! haha so anyway she sent several goodies for me. Aren't I lucky;-)??  Now finally the wait is over and the haul is here!!!

                                                         TAADAA!!!!!!:)
First are 3 eyeshadows by Accessorize.
Now Im a sucker for cute packaging!!! 
Isnt this the cutest!? I love the butterflies on it!! Also these are so pigmented and so buttery

                                                        Eyesahdows without flash!

Eyeshadows with flash!!!

1.
The first eyeshade is in Graphite.
Here it is without flash/


Here it is with flash

2.
                                                          Without Flash.
                                                   Second eyeshadow is Silver dove.
                                                       

With flash!!
I'm in love with this shade. Its so beautiful. Its so difficult to explain this shade, I mean it is silver;P
but when i first saw it i thought it was a goldish silver. I dont know why but it seemed like that:)

3.
Now this is my absolute favorite eyeshadow in Ultra Violet
This shade is very vibrant.
I think its a monochrome eyeshadow. 
Its a mix of purple and blue


Look at how beautiful it is from this angle.


Here it is with flash! very shimmery and pretty!!!
Isn't this gorgeous? I just had to touch it:-P

Honestly this picture is not doing justice to these eyeshade.  Can't wait to make tutorial with these!!!


Next item is an angle brush. This brush is very soft and I love this brush. 
Its my favorite brush to use for a cat eye look.

The Brush is from UBU Drama Queen. in No.31

                                             Next item is from The soap and glory cosmetics lip gloss
                                                        The Sexy Mother Pucker lip gloss!!!!
                                             
                                                     
                                                            It is in the shade Candy Gloss.'
                                                           Its a sheer and shimmery lip gloss
                                                            The shade is similar to Nars Orgasm!!


Now this lip gloss was like wow!! when I put it on. Its a lip plumping gloss. I love this.It has that tingly feeling that rushes the blood to my lips and it gives me a bit of a rosy  just bitten type of look. Also I think it feels like botox! I've never gotten botox done and NEVER will, but that is how I imagine it:P

Now last but not least!!!!!!!!
The Nina Ricci Face Powder!!!

This is in the shade no.2

Its my perfect shade!!

   Now its a refill of the Nina Ricci Face powder and I had to try this on and when I did!! i GASPED!!! AHH!:D Wow was my reaction. I dont have enough words to tell you guys how amazing this powder is!! its so finely milled and soooo buttery and smooth, and not cakey AT ALL!! and when i took a picture. I honestly could not believe how perfect and flawless my skin looked!!
It is pricey, very actually. but if you guys can get your hand on this product! Do it!!! Seriously Run like the wind and get your hands on this! Its my favorite face powder so far!! and it is an investment.  I can assure you. You wont be diappointed:)


So thats it for this haul! Sorry to keep you guys waiting, like forever!!
and Thanks so much for all of these amazing things Ferrari:) Love u!


Sunday, 26 October 2014

silver sparkle!:) makeup tutorial

Hey guys I know I'm very late with updating my blog lately. I apologise for that.  My exams are coming up so my schedule is extremely tight.  I've been running around in classes all day for last 3 months!  It's been extremely hectic. Please do keep me in ur duas! !!! Anyway I managed to get this look up! Finally:-)
 LET'S GET TO IT!!! :)

 This is the finished look:) It's extremely quick and beautiful!!!
Ok first prime your lid.
1.Take a silver cream base and apply it all over your lid..
2: Take the third shade from the palette. It's matte grey and apply it in your crease so there isn't any harsh line. Make sure to do this quick as possible:).
3: Take a flat shader brush dampen it and dip in a matellic silver eye shade!  It makes it pop out and really pretty!!!๐Ÿ˜
4:Take the last two shades the black and grey and mix together and apply it just slightly to the outer corner.  Just to give it depth. But not overly dramatic.
5: Take a matte white eyeshadow and apply it in the brow bone.
6: take a silver base and apply it to the lower lash line.  I would recommend a silver eyeliner so you can add it to your waterline too late.  And also apply in the inner corner.


Add eyeliner and mascara and you done!!!!!! It's that simple! ๐Ÿ˜Š I also took a black eye pencil and just applied it to the outer corner of the lower waterline. But that's optional!. 

Pair this with a nude lip and and light pale pink blush! This look is my favorite. :) do try it guys and tell me how you like it!:) it looks great on all skin tones hair color eye colour all!:)

Last picture๐Ÿ˜‹

Saturday, 4 October 2014

Ateleir Varsace SS 2014! MAKEUP LOOK!:)

    Hey guys  First of all I wanted to start by saying Eid Mubarak to everyone out there!!!  And Im so sorry for the long periods between each post. I've been trying g juggle my schedule. Which is hectic n will be for the next 3-4 month. Sooo I'm so sorry for that:) but ill try my best to post as many posts as possible !:) I do have a  haul coming up! N some reviews!!

     Ok so today's makeup look is inspired by the makeup look for Ateleir  Varsace spring summer 2014. I LOVE THIS LOOK! It was like love at first sight! Seriously๐Ÿ˜๐Ÿ˜‹  the look is very subtle and dramatic n bold all at the same time! :) its such a unexpected way to add a pop of color!


Tell me you love this look just as much as I do guys!:)

To the tutorial!!:)
Ok guys apply your eye primer! 
Then
1: take any bronzey eye base and apply it all over the lid just to make the colors stand out more. I used the Victoria secrets cream shadow in " bronze metal". You can also try the covergirl or max factor X or Maybelline NYX they all have these!
2: Take a Matte light brown eyeshadow and apply it in the crease.
3: take a Shimmery Bronze eyeshadow. I didn't have one in the exact shade so I mix three of my eyeshadows from the Physicians Formula shimmer eye strip palette for brown eyes. You can use any.
4: Take a taupe shade Shimmery. And apply it just to the middle of the  lid.
5: Take a Matte white eyeshadow and apply as the highlight under your brows. 
6: take a gold shade and apply it from the inner corner just to 1/3 of the lower lashline. 

7: Take a turquoise eye pencil and apply it the 1/3 of your top lashline.
8:Take a bright blue eyeshadow and apply it on top of the eyeliner.
9: take a black eye pencil and apply it to the waterline.
10: take the same bronze shade we applied to the lid and apply it to the rest of your lower lash line. 
11: add mascara and your done!!!:)

Pair it with a nude lip and slightly contouring your face.


Matte white eyeshade for brow bone.
Medium matte brown for blending,
The three shade from physicians formula for the bronzey shade,
Urban Decay deluxe palette shades are 
"Honey" for the inner corner of the waterline
"Peace" for the top 1/3 of  the lashline
''Underground" for the the middle of the lid!


I love this look very much guys. I think its looks amazing when worn and so wearable too. Definitely give it a try and tell me what you think!!! Bye !!